Skip to content
An epoxy or concrete coating installation day usually looks much more active than homeowners expect. The finished floor may appear simple, but getting there involves equipment setup, mechanical grinding, crack repair, detailed edge work, vacuuming, coating application, broadcast material, and careful timing between layers. If you are wondering what to expect during epoxy installation, the biggest surprise is usually how much of the day is spent preparing the concrete rather than simply rolling coating onto the floor.
The exact schedule depends on floor size, slab condition, coating system, weather, humidity, repairs, and whether the project is designed as a one-day or multi-day installation. Still, most professional projects follow a recognizable sequence.
Before the Crew Arrives: The Floor Should Already Be Clear
Install day goes much more smoothly when the room is empty before the installers arrive.
For a garage, vehicles, shelving that sits on the floor, storage bins, tools, bikes, lawn equipment, mats, and loose items should usually be moved out of the work area. Wall-mounted shelves may be able to stay, depending on their height and the installation plan.
Homeowners should also know where installers can access electricity and the work area. Pets and children are best kept away from the installation zone because grinders, vacuums, cords, tools, and uncured coating make the space unsuitable for casual traffic.
The goal is simple: when the crew arrives, they should be able to begin floor preparation instead of spending valuable installation time moving belongings.
7:30–8:00 AM: Walkthrough and Equipment Setup
A typical floor coating process day begins with a final inspection.
The installers may walk the floor again, identify cracks, examine previous repairs, check transitions and edges, and confirm any areas that need special attention.
This is also when grinders, industrial vacuums, hand tools, mixing equipment, extension cords, coating materials, and other supplies are staged.
The crew may protect nearby surfaces, door thresholds, walls, or areas that should not receive coating.
This first half hour can look uneventful, but it sets up the entire day. Once grinding starts, the project begins moving quickly.
8:00–10:00 AM: Concrete Grinding Begins
Mechanical surface preparation is one of the most important parts of professional coating installation.
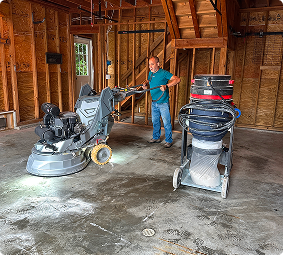
Diamond grinding removes surface contamination, weak concrete paste, old paint, minor irregularities, and other material that can interfere with adhesion. It also creates a suitable concrete profile for the coating system.
This is often the loudest portion of the day.
Homeowners working from home should expect noticeable grinding noise, particularly when equipment is operating directly below or beside occupied rooms.
The duration depends heavily on the floor. A clean, open garage may progress quickly. A floor with old coatings, adhesive, paint, oil contamination, or difficult edges may require much more preparation.
What About Grinding Dust?
One of the most common homeowner concerns is grinding day noise and dust.
Professional floor grinders are commonly connected to high-powered dust collection systems. These vacuums capture a large percentage of airborne concrete dust directly at the grinder.
That does not mean the process is literally dust-free.
Fine residue can still appear around edges, cracks, equipment changes, door openings, or difficult areas. Good crews manage this carefully through vacuum-assisted equipment and thorough cleanup.
If the garage connects directly to the house, keeping the connecting door closed during grinding is usually sensible.
10:00–11:00 AM: Edges, Corners, and Difficult Areas
Large grinding machines cannot reach everything.
Once the main field of the floor has been prepared, installers move to perimeter areas, corners, wall lines, steps, narrow sections, thresholds, and other places the larger machine missed.
Hand grinders and smaller tools are typically used here.
This stage is easy to overlook, yet incomplete edge preparation can create weak points near walls and transitions.
Professional installation means preparing the entire surface that will receive coating, not only the easy central sections.
11:00 AM–12:00 PM: Cracks and Surface Damage Are Addressed
After grinding exposes the actual condition of the slab, installers can see defects much more clearly.
Cracks may be opened, cleaned, and repaired with suitable repair materials. Small pits, spalled areas, divots, control joints, or previous patch failures may also require attention.
Not every crack is treated identically.
A narrow stable crack may require a different approach from a moving joint or badly deteriorated section of concrete. This is one reason installers should evaluate the slab rather than blindly filling every visible line.
Repairs also need to be compatible with the coating system that will follow.
Around Noon: Final Vacuuming and Surface Inspection
Before coating begins, the concrete needs to be exceptionally clean.
The crew will typically vacuum the floor thoroughly, paying close attention to edges, cracks, repaired sections, corners, and transitions.
Loose dust left behind can interfere with adhesion.
Installers may also conduct a final visual inspection at this stage. Once coating is applied, surface-preparation mistakes become much harder to correct.
The floor now usually looks raw, dull, and heavily profiled compared with how it looked earlier in the morning.
That rough appearance is intentional.
12:30–1:30 PM: The Base Coat Goes Down
Now the project begins looking like a floor coating installation.
The base coat is mixed according to the system requirements and applied across the prepared concrete.
Installers usually work strategically because coating materials have limited working times after mixing. The exact method varies by product and system, but proper coverage and consistent application are important.
Edges and detailed areas may be handled separately while the main floor is rolled or spread.
At this point, homeowners should avoid entering the space entirely.
Once coating begins, even a single footprint can become a significant repair problem.
1:00–2:00 PM: Decorative Flakes May Be Broadcast
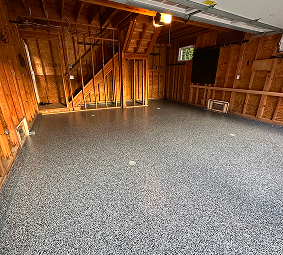
For a full-flake garage floor, decorative vinyl chips are typically broadcast into the wet base coat.
Rather than sprinkling a few flakes decoratively across the surface, many professional systems use a heavy or full broadcast.
The wet coating becomes covered with flakes until it cannot accept much more material.
This stage often makes the garage look dramatically different within minutes.
Color combinations can range from subtle gray and stone blends to warmer tan, brown, or custom mixtures depending on the homeowner’s design choice.
Why the Floor Looks Rough at This Stage
After the flake broadcast, the surface is not finished.
Excess flakes remain loose across the floor, and the texture can be much rougher than the final result.
Depending on the coating chemistry and project schedule, installers may need to allow the base layer to cure before scraping and removing loose material.
This is one reason an advertised installation duration should be understood as a coating system rather than a universal rule.
Some floors can move through multiple stages rapidly. Others require additional curing time between steps.
Later in the Day: Flake Scraping and Cleanup
Once the coating has cured enough, excess decorative flake is removed.
Installers scrape the surface to knock down loose or upright chips and create a more consistent texture.
The floor is then vacuumed again.
This step controls how the finished surface feels and helps prepare it for the clear protective coat.
A poorly scraped flake floor may feel excessively sharp or inconsistent. Proper finishing creates a more refined surface while retaining useful texture.
Afternoon: The Clear Topcoat Is Applied
The protective topcoat is one of the final major installation steps.
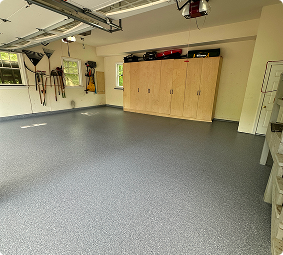
This clear layer seals the decorative system beneath it and becomes the surface that sees vehicle tires, foot traffic, dirt, water, chemicals, tools, and everyday wear.
The topcoat must be applied evenly and at the proper coverage rate.
If additional traction is required, an anti-slip additive may also be incorporated depending on the intended use of the floor.
Once this layer is finished, the appearance starts closely resembling the final floor homeowners were expecting.
Late Afternoon: Equipment Comes Out, But the Floor Is Not Ready Yet
Finishing the coating application does not mean the floor is immediately usable.
The crew will typically remove tools, mixing materials, excess flakes, masking, vacuums, grinders, and other equipment from the property.
They may inspect the finished surface from doorways and accessible edges without walking across uncured coating.
The work area should remain closed off.
Homeowners will usually receive instructions covering when foot traffic is allowed, when belongings can be returned, and when vehicles can be parked on the new floor.
These times vary by coating chemistry and environmental conditions.
Can You Walk on the Floor That Evening?
Sometimes, but not always.
Different epoxy, polyurea, and polyaspartic systems cure at different rates. Temperature and humidity can also influence the schedule.
If the installer says to stay off the floor until the following morning, treat that instruction seriously.
Testing the floor early with a shoe, finger, furniture leg, or pet paw can permanently mark a coating that has not developed enough hardness.
A finished-looking floor is not necessarily a fully cured floor.
When Can the Car Go Back Into the Garage?
Vehicle return time is often longer than light foot-traffic time.
Car tires concentrate weight over relatively small contact areas. They can also carry heat and contaminants onto the coating.
Follow the exact vehicle-return guidance supplied for the installed system rather than relying on generic internet advice.
Parking too soon risks damaging an otherwise successful installation just hours after completion.
What Homeowners Usually Hear, Smell, and See
Install day affects more than just the garage floor.
Grinding produces substantial noise. Vacuums run for long periods. Installers move equipment in and out. Doors may remain open while machinery is operating.
Some coating products may also produce noticeable odors during application and curing.
The intensity depends on the chemistry being installed and ventilation available in the room.
Anyone especially sensitive to odors should discuss this before installation so the contractor can explain the specific products being used and what to expect inside adjacent living areas.
Why Install Timelines Vary From One Garage to Another
It is easy to advertise a simple timeline, but concrete does not always cooperate with a clock.
A 400-square-foot garage with clean, sound concrete is very different from the same-size garage covered in two previous coatings, oil contamination, deep cracks, and deteriorated patches.
Temperature can affect cure speed.
Humidity can matter.
Moisture conditions may require extra attention.
Some repairs need additional preparation or cure time.
Good installers follow the needs of the floor rather than forcing every project into an identical hour-by-hour schedule.
One-Day Installation Does Not Mean One Hour of Preparation
Fast-curing coating systems have made one-day floors increasingly common, but speed should never come from skipping concrete preparation.
The strongest part of a fast installation should still be the beginning of the day.
Grinding, edge work, repairs, cleaning, and inspection create the foundation for everything that follows.
A coating that cures quickly can still fail if it is placed over poorly prepared concrete.
The quality of the installation depends much more on what happens before the coating is mixed than how rapidly the final layer becomes walkable.
A Good Install Day Should Feel Organized, Not Rushed
Professional floor coating installation involves a sequence of jobs that must happen in the right order.
Preparation cannot be rushed because the base coat is waiting.
Repairs cannot be ignored to meet an advertised completion time.
Dust cannot be coated over.
Decorative flakes need consistent application.
Topcoats need appropriate timing.
For homeowners, knowing the coating install day timeline makes the process much less mysterious. Most of the morning is typically dedicated to preparing the concrete. The visual transformation happens later, often very quickly once the coating layers begin.
By the end of the project, the most important work may already be invisible beneath the finished surface.
Frequently Asked Questions About Epoxy Install Day
Do I need to empty my entire garage before epoxy installation?
The floor area should generally be completely clear before installers arrive. Vehicles, storage bins, freestanding shelves, tools, bicycles, floor mats, and other belongings can interfere with grinding and coating. Your contractor can explain whether wall-mounted storage or permanently installed fixtures may remain.
How loud is concrete grinding during floor coating installation?
Grinding can be quite loud, particularly in rooms directly attached to a home. Professional grinders and dust extractors may operate for several hours. If you work from home, planning around the grinding portion of the installation can make the day more comfortable.
Does epoxy floor grinding create dust inside the house?
Professional grinding equipment commonly uses attached dust collection, which captures most concrete dust at the source. Some fine residue may still occur around doors, edges, or equipment changes. Keeping doors between the work area and living space closed can help prevent dust migration.
Should I stay home while my garage floor is being coated?
You usually do not need to watch the installation, although someone may need to be available at the beginning or end of the project depending on the contractor’s process. The work area itself should remain off-limits while grinding, repairs, and coating are underway.
Why does the installer spend so much time grinding the floor?
Grinding creates the surface profile needed for proper coating adhesion while removing weak material, contamination, previous paint, and other substances that may interfere with bonding. A large portion of professional installation time is intentionally devoted to preparation because the coating can only perform as well as the concrete beneath it.
What can delay an epoxy installation day?
Unexpected old coatings, heavy contamination, extensive cracking, damaged concrete, moisture concerns, difficult edge work, weather, temperature, humidity, and curing requirements can all affect the schedule. A good contractor adjusts the installation process to the actual slab instead of sacrificing preparation to meet an arbitrary finishing time.